Thursday, July 26, 2012

quirky camping

I didn't leave a link to the website before, so here it is should you want to visit.

www.quirkycamping.com  just click on the purple words to go directly to the site.

Glamping is a rather fashionable word at present, it is used to describe glamorous or luxurious camping.  Something rather better than a tent and blow up mattress or sleep mat, but definitely an outdoor experience as opposed to staying in a hotel.

At Quirky Camping for example the accommodation is a yurt with a wooden floor and proper, comfortable bed (very comfy, I slept in most of them), there is no electricity but there is cold and solar heated running water.  There are outdoor kitchens with gas stoves but no refrigeration or WIFI.  The toilets are of the composting variety and guests have to park their cars some distance away.  

project complete


 The yurt is now ready for guests, it looks so inviting with the shadows filtering through the canvas walls and the sound of the breeze in the trees.


Glass wash basin in the roundhouse with a sneaky reflected glimpse of the
 hole in the roof and stunning cordwood wall.


Peak inside the composting toilet, all that's missing is a toilet roll holder


leaving the yurt, looking up towards the roundhouse.  it looks a bit stark at present, but the forest will soon reclaim the bare patches.


somewhere quiet to carry out business in the woods


Matty's steps.  Simple, effective and very inkeeping


Looking down from the roundhouse towards the yurt.
None of this was here two months ago.


There is even a pole lathe in the woods, should guests want to try it out, I'll 
have to blog further about pole lathes in a few days time.


Awaiting the first guests.  I hope they are as happy to be here as I have been building it.

Friday, July 20, 2012

the roundwood house is getting there


NW bale wall finishing.  We discussed endless possibilities for finishing the end of the bale walls.  Due to the nature of the building and the fragile nature of straw, when it comes to moisture and rot, there were not a huge number of feasable options.  The straw had to be covered and kept dry whilst the earth needed to fall and look fairly natural down the side of the building.  Here, the waterproof layers continue to encapsulate the straw behind the willow horizontals and are secured with the large vertical trunk.  The tyres hold the willow in place at the other end without damaging the layers behind.


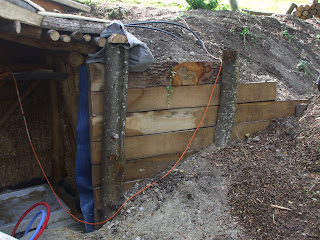
SE side, needed a different solution of finishing and retaining, so we used oak planks to hold the soil back and finish the straw wall.  The shower tray is still visible as the final wall isn't in place yet.


Interior straw walls clipped neatly ready for rendering.  The cloth protects the plumbing for the kitchen sink.  For the moment the tyres will remain visible.  They protect the bales from the damp floor/ground and are filled with large stones.


Adam working the first layer of lime mortar well into the bales.  The further into the bales this layer goes the better supported the final wall will be.  Not particularly strenuous work but hard on the fingers with constant forcing of mix into the straw.  3 parts sharp sand, 1 part lime and enough water to form a slurry.


Cordwood wall sections under construction.  They rest on horizontal beams of cleaved chestnut wrapped in polythene to keep them off the ground.  The two sides of the wall are mortared and the central area is filled with wood chippings, this reduces the amount of mortar used and in enclosed buildings provided an added layer of insulation.  


Second layer of lime mortar in position, scratched to take the final finish coat once dry.


Evening sunshine on a portion of finished cordwood wall.  It's starting to look good.

willow roofing


Matty and I starting to weave the roof support layer.  We nailed lengths of willow to each rafter then wove them round in a giant structure.  Their length and solidity made it strenuous work to bend each branch into position.


As the willow would be seen from underneath, it was important to check that it looked good from below.  


Three days later the weaving is complete.  It got more and more challenging to bend the branches into position, even choosing lighter more supple lengths made for interesting work.  The surface covered a multitude of unevenness underneath and looked almost too good to support further layers.


From ground level the structure is starting to resemble a building.  


Layers of protective material, waterproofing and further protective surfaces are added to make the structure waterproof.  Folding the layers proved challenging as there was a huge surplus at the centre that had to be folded to keep the whole thing water tight.


Doing battle with the final layer of geotextile membrane 


Finishing touches to the layer of earth.  We barrowed about 6 tons of soil onto the roof, sufficient to suport vegetation throughout the year with a bit of watering through the summer.  The whole building remained solid and comfortable to walk on even with all this weight.  Most of the planting will happen in the autumn as it is a better time to get plants to establish.  By this time next year the roof should be vibrant and green.

Sunday, July 08, 2012

roundhouse walling


reciprocal roof detail


the roundhouse before the walls went up


straw retaining walls pinned with chestnut stakes


protecting the straw from moisture and the liner from damage


backfilled with soil


A couple of weeks ago, after getting the garden up to speed I became involved in the roundhouse project.  The round ‘henge’ complete with reciprocal roof were already in place.  We have since worked on the back, straw wall, its protection from the earth backfill.  We used a wooden trellis behind the bales to allow the wall to breathe, followed by an old padded pool layer to provide cushioning and then a double layer of heavy duty polyethene which drops way below ground level and is held in place with a land drain.  All of which is then protected with a layer of woven landscape fabric.  Where there are protruberances, they are further cushioned with squares of pool cover, not exactly ecological, but great use of something that would otherwise contribute to landfill.
Backfilling and compressing of the earth was hot, time consuming work and me being the thinnest spent most of the day squeezed between the back wall and the earth tucking in the layers of protection and then guiding and compressing the earth into place.  Happy days.

willow roof structure


Matt and Matty encouraging the first willow onto place on the roof.


Nearing completion with Harry, Nic and Matty hard at work


Too good to cover with soil

layers of protection


and a topping of soil

The roof was much more fun.  Giant spirals of willow wound and attached round the roof to be viewed from below once the structure is complete.  This process was amazingly time consuming and energetic, each length of willow being encouraged into place, often against its natural tendencies.  The result was amazing and almost too good to cover with earth.  
The willow spiral was covered with white fabric to show it off well then double layers of polyethene, landscape fabric and then earth.  The plan is for the roof to return to nature with ivy, perrywinkle and woodland plants creating a green carpet and disguising the building from above.  It’ll take a while and there are more pressing things to do at the moment than wandering about the woods looking for rooted ivy and interesting specimens to relocate.  Better done in the autumn when it is cooler too I would have thought.